13.2 フロントエンドでのデータ受信
サーブレットから返却された JSON データを、JavaScript で受信して画面に表示する方法を学びます。
13.2.1 Fetch API でサーブレットと通信
第 11 章で学んだ Fetch API を使って、自分のサーバーで動いているサーブレットにリクエストを送ります。
fetch("/javascript_basic_webapi/api/users")
    .then(response => response.json())
    .then(data => {
        console.log(data); // 配列として取得できる
    });
相対パスと絶対パスの使い分け
サーブレットにリクエストを送る際、URL は相対パスで記述するのが一般的です。
// 相対パス(推奨)
fetch("/javascript_basic_webapi/api/users")

// 絶対パス(開発環境と本番環境で URL が変わる)
fetch("http://localhost:8080/javascript_basic_webapi/api/users")
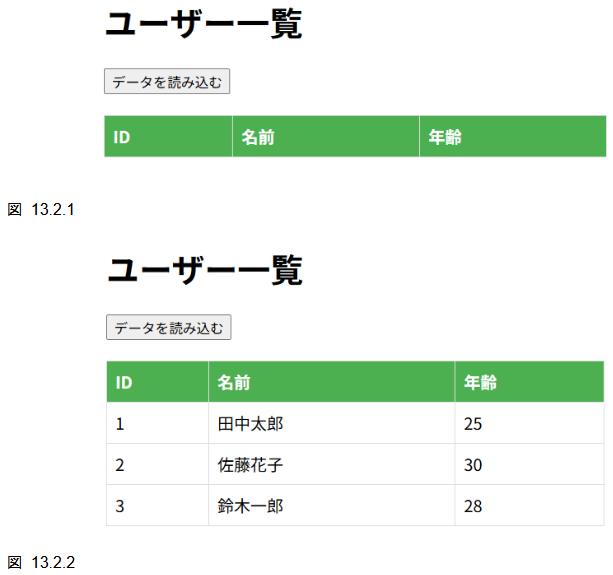
13.2.2 受信データの表示
受信した JSON データ(配列)を、DOM 操作を使って HTML テーブルとして表示します。
ソースフォルダ:src/main/webapp/
パッケージ名:index.html, js/app.js
index.html
<!DOCTYPE html>
<html lang="ja">
<head>
  <meta charset="UTF-8">
  <title>ユーザー一覧</title>
  <style>
    table {
      border-collapse: collapse;
      width: 100%;
      margin-top: 20px;
    }
    th, td {
      border: 1px solid #ddd;
      padding: 8px;
      text-align: left;
    }
    th {
      background-color: #4CAF50;
      color: white;
    }
  </style>
</head>

<body>
  <h1>ユーザー一覧</h1>
  <button id="loadBtn">データを読み込む</button>

  <table id="userTable">
    <thead>
      <tr>
        <th>ID</th>
        <th>名前</th>
        <th>年齢</th>
      </tr>
    </thead>
    <tbody id="userTableBody">
      <!-- ここにデータが動的に追加される -->
    </tbody>
  </table>

  <script src="js/app.js"></script>
</body>
</html>
js/app.js
// app.js

// ボタンとテーブルのbody部分を取得
const loadBtn = document.querySelector("#loadBtn");
const tbody = document.querySelector("#userTableBody");

// データを読み込む関数
function loadUsers() {
  fetch("/javascript_basic_webapi/api/users")
    .then(response => response.json())
    .then(users => {
      // テーブルの中身をクリア
      tbody.innerHTML = "";

      // 取得したユーザーデータをテーブルに追加
      users.forEach(user => {
        const tr = document.createElement("tr");

        const tdId = document.createElement("td");
        tdId.textContent = user.id;

        const tdName = document.createElement("td");
        tdName.textContent = user.name;

        const tdAge = document.createElement("td");
        tdAge.textContent = user.age;

        tr.appendChild(tdId);
        tr.appendChild(tdName);
        tr.appendChild(tdAge);

        tbody.appendChild(tr);
      });
    })
    .catch(error => {
      console.error("データの取得に失敗しました:", error);
    });
}

// ボタンクリック時にloadUsers関数を実行
loadBtn.addEventListener("click", loadUsers);
実行結果
解説
9 行目から 11 行目で、Fetch API を使って/api/users に GET リクエストを送り、レスポンスを JSON として解析しています。
9:   fetch("/javascript_basic_webapi/api/users")
10:     .then(response => response.json())
11:     .then(users => {
13 行目で、既存のテーブル内容をクリアしています。
13: tbody.innerHTML = "";
16 行目から 33 行目で、取得したユーザーデータの配列を forEach で繰り返し処理し、各ユーザーごとにテーブル行(tr)とセル(td)を作成して追加しています。
16: users.forEach(user => {
17:     const tr = document.createElement("tr");
18:
19:     const tdId = document.createElement("td");
20:     tdId.textContent = user.id;
35 行目から 37 行目で、エラーが発生した場合の処理を記述しています。
35: .catch(error => {
36:     console.error("データの取得に失敗しました:", error);
37: });